Setup a Webhook
Step 1: Create your endpoint
Firstly, you need to create a URL endpoint in your application that can receive the webhook data by an HTTP or HTTPS POST request generated from SMTP2GO. The required URL format and further details including optionally securing your URL with a username/password are covered in the Webhooks Overview article.
Step 2: Setup the webhook in your account
Secondly, you will need to create the webhook in your account which can be done in the SMTP2GO App or by using the API.
Setup in the App
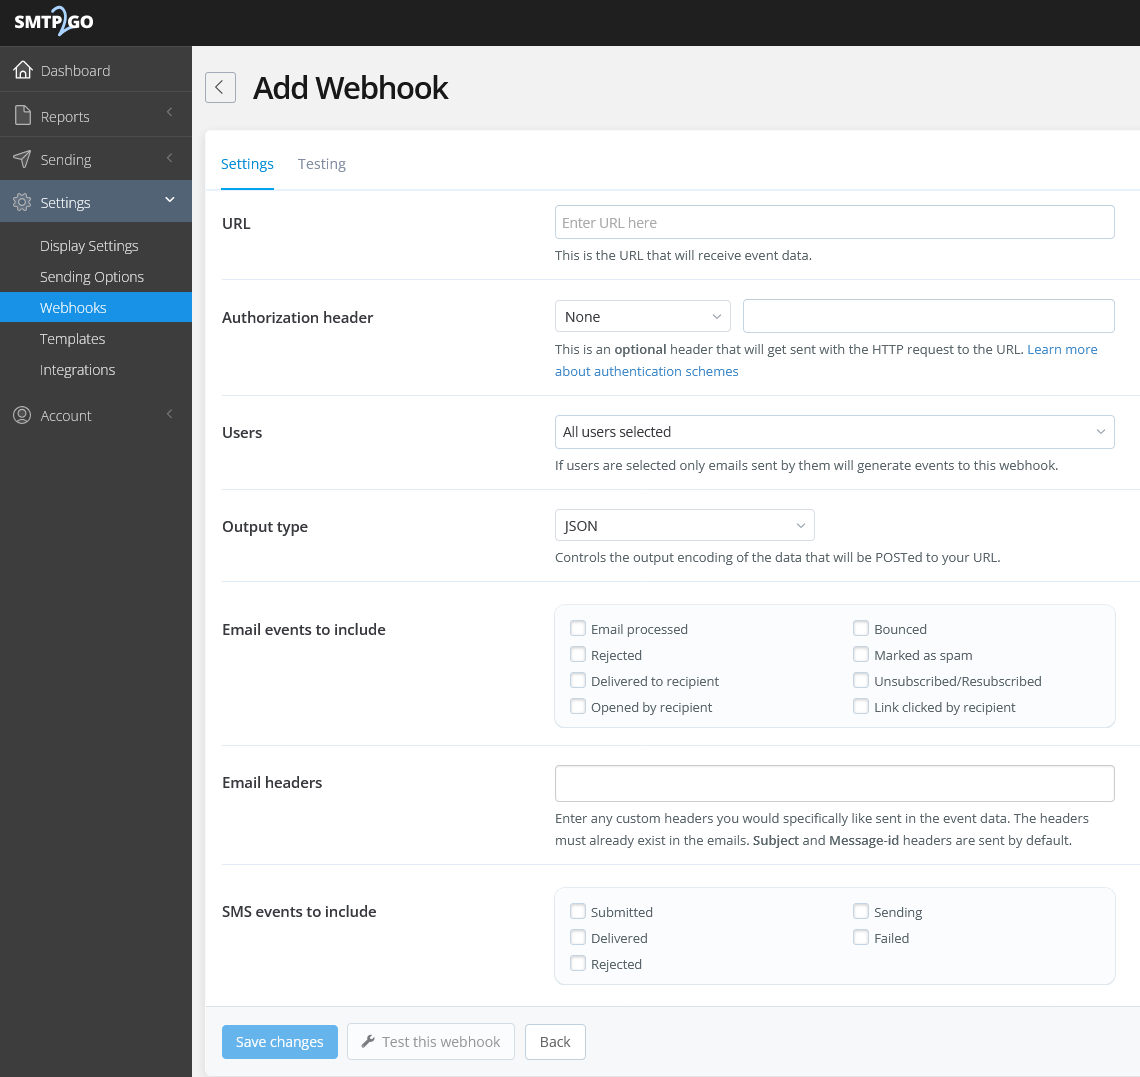
In the App, navigate to the "Settings > Webhooks > Manage Webhooks" section.
Click the "Add Webhook" button and define the webhook:
- URL - Enter the URL where the data will be POSTed to.
- Authoization header - Optionally include a bearer or basic authorization header.
- Users - Select the Users the Webhook will trigger for (these are your SMTP Users, API Keys or Authenticated IPs (IP Authentication).
- Output type - Select the output type of either JSON or Form encoded.
- Email events to include - Select the email events you'd like the webhooks to trigger for.
- Email headers - Enter any custom email headers you would specifically like sent in the event data.
- SMS events to include - Select the SMS events you'd like the webhooks to trigger for.
Click "Save changes" to save the Webhook and optionally click the "Test this webhook" button to test the webhook for your selected events.

Setup using the API
The webhook/add endpoint can be used to add a webhook programmatically. View the Add a new Webhook API reference page to see the accepted parameters, code examples and test.
Using the API you can additionally view, edit and remove webhooks.
Below is a cURL example of adding a new webhook that will trigger immediately when an open, bounce or click event occurs for sending through the defined API Key and an SMTP User (username).
curl --request POST \
     --url https://api.smtp2go.com/v3/webhook/add \
     --header 'Content-Type: application/json' \
     --header 'X-Smtp2go-Api-Key: api-*********APIKey**************' \
     --header 'accept: application/json' \
     --data '
{
  "events": [
    "open",
    "click",
    "bounce"
  ],
  "usernames": [
    "api-*********APIKey**************",
    "Usernametest123"
  ],
  "url": "https//webhook.example.com/webhook12345"
}
'
Step 3: Receive webhook requests
Finally, with your webhook set up, you'll begin to receive the POST requests automatically to your URL endpoint when your webhook events occur. The event data will be JSON or Form encoded in the body depending on the output defined in the webhook's settings. Upon receiving the webhook event requests, your application can parse the data and take action based on the event.
Updated 5 months ago